However, I was able to make some gems in Week Two:
Honey Roasted Peanuts (adapted from here)
 What you need:
- 1 lb raw peanuts (found in the baking aisle, usually)
- 2 1/2 Tbsp honey
- 1 1/2 Tbsp maple syrup (the real stuff, please)
- 1 tsp kosher salt, plus more for sprinkling
- 1/2 tsp vanilla extract
- 1/4 tsp cinnamon
- 1/4 tsp ginger powder
- 3 Tbsp granulated sugar
What you do:
- Preheat oven to 350 degrees.
- Pour peanuts in a large mixing bowl. Set aside.
- Combine honey, maple syrup, butter, salt, vanilla extract, cinnamon, and ginger powder in a microwave-safe bowl. Heat in the microwave until the butter has melted.
- Pour the honey mixture over the peanuts and stir well to coat.
- Arrange peanuts into one layer on an aluminum foil-lined baking sheet, and bake for 5 minutes. Remove baking sheet from the oven and stir the nuts. Bake for 5-7 more minutes, until the nuts are golden brown. Don't be fooled by the skins on the nuts, look at the nut meat itself.
- When the nuts are sufficiently roasted, remove them from the oven and toss in a clean, large mixing bowl with the sugar and some more salt to taste.
- Cool completely, and try not to eat the entire batch in one sitting
Last Saturday, my roommate Trevor hosted a breakfast celebration in honor of his girlfriend, Sarah, finishing the MCAT. On the menu:
- strawberry rhubarb muffins (a la Emily)
- pork sausage with mushrooms (a.k.a. umami overload; by Michael)
- sourdough pancakes with a fresh berry compote (pictured in-action right, back; implemented by Trevor and Sarah, respectively)
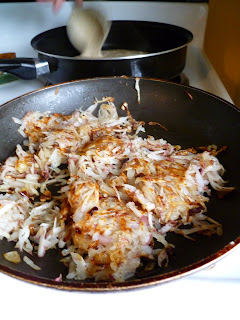
- hash browns with caramelized onions (pictured right, front; de moi)
- baked doughnuts (pictured below; recipe here; a Michael & Corinne creation)
- crisp ginger beer (brewed by Trevor)
Hash browns with caramelized onions (did you know hash browns are two words? I always thought it was one...)
What you need:
- 1 Tbsp olive oil
- 1 medium onion, minced
- 1/2 tsp Herbes de Provence (aka the best herb mix ever)
- pinch salt
- 1-2 cloves garlic, minced
- 1 lb potatoes (I prefer red, used here, but good ole Russets will do the job)
- 2 Tbsp pork sausage grease (or a mixture of butter and olive oil)
- salt and pepper, to taste
- Caramelize the onion in the olive oil with the Herbes de Provence and a pinch of salt.
- In the meantime, scrub the dirt from the potatoes and grate them (but please don't peel them!)
- Place the grated potatoes on a plate lined with a paper towel. Place a paper towel over the potatoes and wring them out over the sink. Be careful for breaking paper towels. Replace the paper towels and let the potatoes "drain" while the onions are finishing.
- When the onions are all caramelized and delicious, add the garlic and brown for 1 minute.
- Add the grease and potatoes. Stir to combine and sprinkle with salt and pepper to taste. If you have too many potatoes to comfortably fit in the pan, make in separate batches. Just remember to take some of the onions and garlic out for the other batches.
- Cook until browned on the bottom, then flip and brown on the other side
101 Cookbook's Baked Doughnuts (recipe followed to the letter from here)

Oh my, these are good. Even Michael thinks so, and he's got high standards when it comes to doughnuts. We made these the night before, and the ones we dipped in powdered sugar had turned into glazed! Words of warning: they take a while to make, since they're yeasted and need time to rise. So don't expect to wake up on a Sunday morning and have doughnuts before you've finished your coffee. They're definitely best fresh out of the oven, but they don't fare bad after a night in storage. They do have a tendency to dry out after a couple days, but can be nuked for a couple seconds if you're in a pinch for breakfast and don't want to have oatmeal, again. Also, if you want a hole in the middle of your doughnut, you'll need a super tiny cutter for it. Smaller than the smallest one that comes in the graded biscuit cutter set.
That night, I made fettucini with a fresh tomato sauce. Although this is not a new recipe, I am delighted to share it here:
Fresh Pasta (adapted from a recipe provided in a pasta making class I took in 2008)

What you need:
- 9 oz (about 2 cups) AP flour, plus extra for dusting
- 1 1/2 tsp kosher salt
- 2 eggs
- 1-3 Tbsp cold water
- 1 tsp olive oil
- Pulse the flour and salt in a food processor.
- Crack eggs into a liquid measuring cup. Pour cold water on top of the eggs to make 1/2 cup. This could vary between 1-2 Tbsp, depending on how large the eggs are.
- Add eggs and water, along with the olive oil, to the food processor and mix until the dough comes together. It will be sandy.
- With the processor running, add 1 more Tbsp of water through the chute. At this point, the dough should come together into a ball. If not (and it has been longer than 30 seconds), keep adding water, 1 Tbsp at a time, until it does.
- Turn the dough out onto a lightly floured surface and knead for 10 minutes. Not 5 minutes, and that should be good enough; 10 minutes. Add flour as needed, but don't overdo it. At the end of 10 minutes, the dough should be smooth and sticky enough to make a wonderful smacking sound when pressed, without sticking to your fingers.
- Wrap in plastic, and let rest in the fridge (it was functioning at this time) for an hour.
- Roll out as desired. You do not need a pasta machine to do this; I have only had mine for a little over a year now. You can watch a video on how to make the super yummy shape trofiette here.
- Dry while your pasta water is boiling and cook until al dente. Make sure you salt the water to an adequate degree (more than you'd think), so the flavor is imparted to your noodles.
This sauce is seriously amazing. I've made the three-ingredient version before many times, but once decided to add two additional ingredients, which heightened it beyond belief. I usually keep a bottle of white wine in the fridge (when operational) for cooking purposes, and I talked about my love of Herbes de Provence above. When I made the sauce with fresh tomatoes, it was a little more liquidy than when I had made it from a can, but I was too hungry to let the sauce thicken any more over the heat.

What you need:
- 2 lbs ripe tomatoes, peeled; or one 28-oz can whole, peeled tomatoes
- 5 oz unsalted butter
- one medium onion, peeled and halved
- salt to taste
- 1 glug white wine, good enough quality that you can drink it, because you need a glass of wine with you when you cook; it's not fair to yourself to cook with wine and not drink it
- 1 pinch Herbes de Provence
- Combine all ingredients besides salt into a medium saucepan, put over medium heat, and slowly simmer for about 45 minutes. Stir occasionally, pressing the tomatoes against the side of your pan with your spoon.
- Taste, and add salt as needed. The sauce is ready when the fat separates from the tomatoes. Discard the onion.
Michael and I made enchiladas with everything from scratch (duh) last Sunday, right as the fridge was descending into tepid-ness. It will be a post of its own and will be up in the next few days.
No comments:
Post a Comment